Build a Beautiful Baby Crib: A Rewarding Woodworking Project
9/22/20245 min read
Introduction to Baby Crib Building
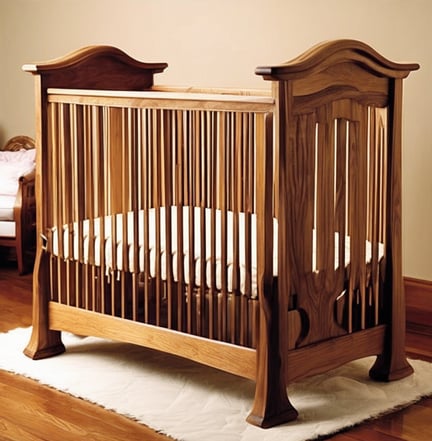
Building a baby crib is not just a woodworking project; it is an opportunity to craft a sanctuary for your child that embodies both safety and love. A crib serves as one of the first pieces of furniture your baby will experience, providing them with a secure sleeping environment. For many parents, creating a custom crib offers a way to ensure that their little one has a unique and personalized space that meets their specific needs. This process involves careful planning, meticulous design, and skilled craftsmanship, making it a rewarding endeavor.
One of the myriad joys of building a baby crib is the profound sense of accomplishment derived from bringing a vision to life. As you select materials, design the structure, and put your skills to the test, the act of creation becomes a cherished experience. This especially holds true when considering the lasting legacy that a hand-crafted crib can represent. It can evolve into a family heirloom, passed down from generation to generation, thereby enriching family traditions and connections.
Beyond the practical aspects of constructing a safe sleeping area for your infant, crib building is an avenue through which you can express creativity and craftsmanship. By utilizing quality materials and incorporating personal touches into the design, you create a piece of furniture that not only fulfills a necessary function but also embodies your family’s values and aesthetics. The ability to mold your ideas into a tangible product fosters a meaningful connection between your craft and your loved ones. Ultimately, building a baby crib is a celebration of parenting, practicality, and artisanal skill, making it an exceptionally rewarding woodworking project.
Essential Materials and Tools
Building a baby crib requires careful consideration of the materials and tools to ensure safety, durability, and aesthetics. Choosing the right type of wood is crucial; hardwoods such as oak, maple, or birch are often recommended due to their strength and safety standards. These woods provide a sturdy frame that can withstand the rigors of daily use while offering a smooth surface that minimizes splintering. Additionally, it is vital to ensure that the wood is sourced from sustainable forests, adhering to environmental standards.
When it comes to hardware, look for non-toxic finishes, such as water-based or oil-based sealers, that are safe for babies. Stainless steel screws and brackets are ideal as they are resistant to rust and corrosion, ensuring a secure assembly that maintains its integrity over time. Avoid using materials with harmful chemicals, as these can pose a risk to the baby's health.
As for tools, a basic set for beginners may include a tape measure, square, saw (hand saw or circular saw), drill, and sandpaper. More experienced woodworkers may opt for advanced machinery, like a table saw, router, and belt sander, which can expedite the project while offering more precise cuts and finishes. Regardless of skill level, having a complete toolbox will facilitate the woodworking process.
Moreover, when sourcing materials, consider local lumberyards and reputable suppliers that promote sustainable practices. Additionally, recycling wood from old furniture or pallets can be a rewarding and eco-friendly approach. Prioritize safety by ensuring all equipment and materials meet regulatory guidelines for children's products. By carefully selecting your materials and tools, you lay the groundwork for a beautiful and safe baby crib.
Step-by-Step Woodworking Plans
Building a beautiful baby crib is a rewarding endeavor that combines creativity with practical woodworking skills. To facilitate a smooth construction process, follow this comprehensive step-by-step guide. This will ensure successful assembly whether you are a novice or an experienced woodworker.
Begin by selecting high-quality wood that is safe and suitable for children's furniture. Popular choices include maple, oak, and birch, which offer durability and an appealing finish. Once you have gathered your materials, proceed by measuring and cutting the wood according to your crib design. Utilize a saw for precise cuts, and ensure that you wear appropriate safety gear during this process.
After cutting the wood pieces, perform a dry fit to understand how the components will come together. This is a crucial step to ensure all parts fit correctly before any permanent assembly takes place. Use wood glue to bond the pieces, allowing ample time for drying. Clamp the joints together to secure a firm hold while the glue sets. Following the assembly, check for any unevenness and use a sander to smoothen the edges. Sanding is essential to avoid splinters that may harm a child.
Once the assembly is complete, focus on finishing your crib. Choose a non-toxic paint or varnish to enhance the crib's aesthetic appeal while ensuring safety for the baby. Apply the finish in thin layers, allowing adequate drying time between applications. A well-applied finish not only beautifies the crib but also protects the wood from wear and tear over time.
In conclusion, following these detailed woodworking plans will guide you through the intricate process of building a beautiful baby crib. With patience and attention to detail, you will create a piece of furniture that is both functional and visually appealing, perfect for any nursery.
Safety Guidelines and Final Touches
When embarking on the rewarding journey of building a baby crib, adhering to safety guidelines is of paramount importance. Newborns are particularly vulnerable, necessitating strict compliance with safety standards to ensure their protection. One crucial aspect is the choice of materials, especially when it comes to paint and finishes. It is advisable to select non-toxic, water-based paints or finishes specifically labeled as safe for children. These products do not emit volatile organic compounds (VOCs), thereby minimizing any potential harm to infants.
Structural integrity is another critical consideration in crib construction. It is essential to regularly check that all joints and connections are secure and robust. The crib slats should be spaced no more than 2.375 inches apart to prevent any accidental entrapment. Furthermore, the entire structure should be tested for stability; the crib must not wobble or sway under pressure. Ensuring that the mattress fits snugly without any gaps is equally important to eliminate the risk of suffocation.
Design considerations also play a vital role in safety. Avoid sharp edges and points by rounding off all corners, and refrain from using decorative elements that could pose choking hazards. Once safety measures have been implemented and the crib passes all inspections, you can then focus on aesthetic customizations that will make the crib the centerpiece of your nursery. Adding a fresh coat of safe, vibrant paint or attaching colorful decals can enhance its visual appeal. Soft bedding, with a fitted sheet that matches the crib's color scheme, will not only contribute to its beauty but also provide comfort for your baby.
Lastly, maintaining the crib's condition is essential for longevity. Regularly inspect the crib for any signs of wear and tear, as well as ensuring that the finish remains intact. By adhering to these guidelines and incorporating thoughtful touches, your beautifully crafted baby crib will provide both safety and aesthetic appeal for years to come.


Inspiration
Explore DIY woodworking projects and expert tips.
Connect
Learn
contact@diywoodworkguide.com
© 2024. All rights reserved.